No article on the web is complete unless it has good relevant images to complement the text. Finding that perfect image isn’t just about making it contextually relevant. It’s also about pairing it with the design, making sure it has the right aspect ratio, and, most importantly, has the right focus.
Inevitably, these struggles and challenges make their way into the content management system. Content editors end up creating, cropping and uploading different sizes of the same image. But using different sizes of the same image in other contexts seldom yields good results; the focus might be clipped, awkward looking, or completely missing. Over time this results in a confusing collection of wildly different images that grow increasingly difficult to maintain.
So we decided to build something that would quell the confusion: FocusPoint.
How the Confusion Starts
Every image has a “focus point”; that area containing the thing a person should be looking at.
Let’s look at the portrait photo shown below as an example. Here we can see that the “thing” that a person should be looking at is the airplane. Not just the airplane, either, but the nose.
A portrait photo of an airplane
Now let’s suppose there’s a height requirement.
Without any hints as to what the focus is supposed to be, we could end up with an image where the plane has been cropped out, giving us a lovely photo of the sky (see image below). There’s nothing wrong with a picture of the sky — except maybe the fact that airplane.jpg isn’t a great name for the file (see how the confusion starts?) The image is the right height, fits in the right container, but it’s not the right focus.
A portrait photo of an airplane (cropped without considering focus)
How FocusPoint Helps
FocusPoint makes sure that your image looks great in any container (see image below), by ensuring the spare parts of your image (negative space) are cropped before removing the focus area.
A portrait photo of an airplane (cropped using FocusPoint)
This is implemented in Kentico as a form control called Image with FocusPoint. Image with FocusPoint will let you select an image from the Media Library or copy a URL from an external service.
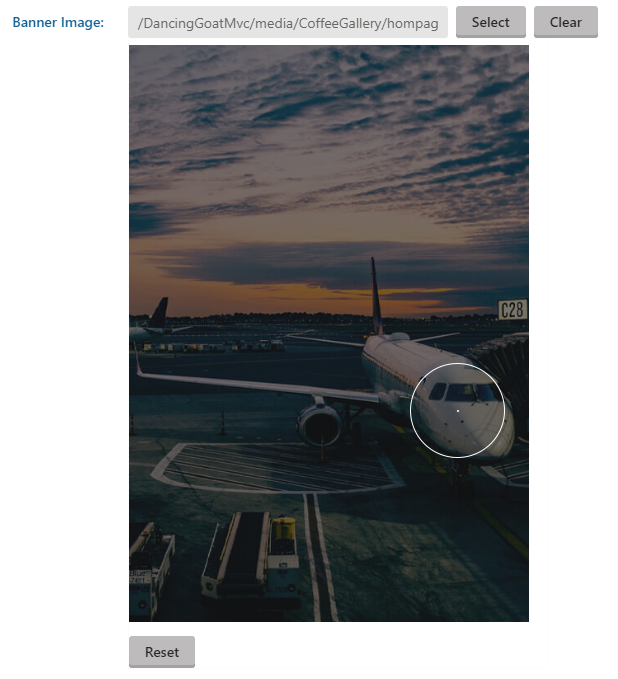
Once you’ve selected an image, the FocusPoint Form Control shows a preview image where you will be able to identify the focus point by clicking on the image itself.
Image with focus point helper tool
When the user clicks an image area, the image URL is updated with the focus point's x and y values as a query string. Then the user needs to save the page to apply the focus-x and focus-y parameters.
Integrating FocusPoint
Just Importing the form control won’t be enough. The form control only provides a helper tool to determine the focus values instead of a user. A developer or maintainer will need to download a NuGet package called EXLRT.Kentico.Mvc.FormControls.Focuspoint and install it on the MVC site.
With this package, some handy HTML extensions integrate into the MVC project. This includes some FocusPoint styles and JavaScript files for the layout. RenderFocuspointStyles and RenderFocuspointScripts (see snippet below) can be found in the EXLRT.Kentico.Mvc.FormControls.Focuspoint.Extensions namespace. The RenderFocuspointScripts extension can take additional parameters for the throttle duration and a Boolean parameter, recalculating the focus point on a window resize event. Be mindful that RenderFocuspointScripts is dependent on jQuery, make sure that jQuery is loaded first in the <head>.
Another FocusPoint requirement is pre-defined HTML containers for the cropped images. This keeps content from jumping around after the browser loads the image. If any testing is needed, such as controlling height or display property, a stylesheet or style block with focuspoint-testing classes can help.
<style>
	// sets the height of the image container
        .focuspoint-testing {
            height: 380px;
        }

	// hide image inside container to prevent image to be loaded before calculation was finished
        .focuspoint-testing img {
            display: none;
        }
</style>
After everything is set up on the MVC side, we need to make sure the CMS's image's value is properly passed into the FocusPoint extension.
The extension above will render the HTML (see code snippet below) with the necessary parameters for focuspoint to work properly. Also, there are a few extra parameters which allow customizing classes, alt text and title text.
No solution is perfect, and this is no exception. There still may be cases where content editors will have to manually make tweaks to images. But now they have a handy helper tool that lets them visually set the focus point on an image directly from Kentico.
Source code and configuration samples ready-to-use in Kentico's demo "Dancing Goat" site can be found on Github.